- Back up GRUB configuration file.
cp /boot/grub/menu.lst /root/backup/menu.lst.grub.bak
cp /boot/grub/menu.lst /boot/grub/menu.lst.bak - Add Windows XP boot up option in the GRUB menu.
Vi /boot/grub/menu.lst
add following lines in the menu.lst:
title Windows XP
map (hd0) (hd1)
map (hd1) (hd0)
root (hd1,0)
chainloader +1
Note:
map (hd0) (hd1)
map (hd1) (hd0)
This two lines are called "virtual swap" which can solve windows installed on second harddisk.
root (hd1,0) (hd1,0)means on second harddisk's first partition.
Sunday, December 27, 2009
Add Windows XP to the GRUB menu
Saturday, December 26, 2009
Enable Dlink DWA-110 USB Wireless Adapter on CentOs 5.4
Plug in the USB wireless adapter
Check the chipset of the USB wireless adapter by using following command.
[root@localhost sbin]# lsusb
Bus 005 Device 001: ID 0000:0000
Bus 001 Device 004: ID 07d1:3c07 D-Link System Wireless G DWA-110 Adapter
[root@localhost sbin]# lsmod | grep rt
rt73usb 60481 0
crc_itu_t 35265 1 rt73usb
rt2x00usb 47041 1 rt73usb
rt2x00lib 56641 2 rt73usb,rt2x00usb
mac80211 182985 2 rt2x00usb,rt2x00lib
cfg80211 63825 2 rt2x00lib,mac80211
Enable ELRepo repository
To install ELRepo for RHEL5, CentOS-5 or SL5:
Import the public key:
rpm --import http://elrepo.org/RPM-GPG-KEY-elrepo.org
Install firmware for Dlink DWA-110 wireless adapter:
yum --enablerepo=elrepo install rt73usb-firmware

Open NetworkManager serveice at the system start up:
chkconfig NetworkManager on

service NetworkManager start

Turn off network and wpa_supplicant services at boot time as NetworkManager will in charge the network connections.
chkconfig network off
chkconfig wpa_supplicant off


Reference:

Making Wireless work on your laptop(or desktop) http://wiki.centos.org/HowTos/Laptops/Wireless#head-a7388039af96da5400e599133447452d2ca61fb5
Sunday, November 29, 2009
Linux Running level
There 7 running level in Linux system:
To check which program are running at which level use command chkconfig --list.
To check which program are running at which level use command chkconfig --list.
Sunday, November 15, 2009
Usefull word in IT tech doc
A
adjacent: [ә'dʒeisәnt]adj. 毗连的, 邻近的, 连接的 be adjacent to...
anomaly: [ә'nɒmәli] n, anomalous thing; irregularity
anomalous: [ә'nɒmәlәs] adj. different from what is normal; irregular
E
erratic: *[i'rætik] adj, irregular or uneven in movement,quality or behaviors; unreliable
adjacent: [ә'dʒeisәnt]adj. 毗连的, 邻近的, 连接的 be adjacent to...
anomaly: [ә'nɒmәli] n, anomalous thing; irregularity
anomalous: [ә'nɒmәlәs] adj. different from what is normal; irregular
E
erratic: *[i'rætik] adj, irregular or uneven in movement,quality or behaviors; unreliable
Thursday, October 29, 2009
Let non-root user can reboot linux box
There are one command called sudo could allow normal linux user execute root command. The configuration file or sudo command is /etc/sudoers and the configuration file should only be modified by using visudo command. For example we creat a group called shutdown. Following line will allow all shutdown group user can use sudo shutdown the linux box.
%shutdown ALL=(root) NOPASSWD: /sbin/reboot
%shutdown ALL=(root) NOPASSWD: /sbin/halt
%shutdown ALL=(root) NOPASSWD: /sbin/shutdown
usermod command can add user to other group.
Options:
* -d home directory
* -s starting program (shell)
* -p password
* -g (primary group assigned to the users)
* -G (Other groups the user belongs to)
Example: To add the group 'others' to the user roger
usermod -Gothers roger
chgrp, chown command can change the group. chgrp can be used by normal user
*
chgrp group target1
* chown [-R] newowner filenames
Example:Give permissions as owner to user test.
chown test files.log
Clean up SQL database use command line tools
There are some SQL server command line tools are installed in C:\Program Files\Microsoft SQL Server\80\Tools\Binn folder. OSQL.exe can connect to the database and execute SQL query on it.
The usage of OSQL.exe is
OSQL /u username
system will pop up for password, after authentication. we can type in SQL query and execute them on the server.
for example
To release unused database space:
DBCC SHRINKDATABASE (local, 80 TRUNCATEONLY)
GO
To find a database name:
select db_name(0) [0 is the database index number]
Go
Sunday, October 11, 2009
Juniper Router Interface Naming:
Juniper router interface naming based on model:
“media type-FPC number/PIC number/port number” It commonly knows as MM-F/P/T model for M series router.
“media type-PIM slot number/virtual PIM number/port number, It commonly knows as MM-F/P/T for J series router. Fixed interface use PIM slot number 0.
FPC - Flexible PIC Concentrator which contain several PIC slots (on M series)
PIC – Physical Interface Card
PIM – Physical Interface Module (on J series) Each PIM contains a network processor that handles some of the packet processing functions.
at: ADSL interface;
dsc: Virtual interface that discards packets;
fxp0: This is an Out of Band (OOB) management Ethernet interface. It is connected to the router's Routing Engine (RE) and can be used for Out of Band management access to the router. It can also be used to send management messages such as syslog or Simple Network Management Protocol (SNMP) traps. This interface is a nontransit interface, which means that traffic cannot enter this interface and exit via a LAN/WAN interface, nor can it enter a LAN/WAN interface and exit through the management interface.
fxp1: This is an internal Fast Ethernet or Gigabit Ethernet (depending on the model of router) interface between the RE and the Packet Forwarding Engine (PFE). This interface is never configured but can be helpful when troubleshooting router issues. It is only in application-specific integrated circuit (ASIC) platforms (M/T-series) and not in the virtualized PFE J-series platforms.
e1: E1 WAN interface;
fe: Fast Ethernet(10/100) LAN interface;
ge: Gigabit Ethernet (10/100/1000) LAN interface;
gr,gre: Generic touting encapsulation (GRE) interface for tunnel services-this interface is internally generated and not configurable;
ip, ipip: IP-over-IP interface-this interface is internally generated and not configurable;
ls, lsi: link services interface- this interface is internally generated and not configurable;
mt, mtun: Muticast GRE interface-this interface is internally generated and not configurable;
pd, pimd: Protocol Independent Multicast(PIM) de-encapsulator interface-this interface is internally generated and not configurable;
pe, pime: PIM encapsulator interface-this interface is internally generated and not configurable;
pp: Point-to-point Protocol(PPP) interface-used for PPP over Ethernet (PPPoE);
se: Serial interface(include EIA230, RS232, RS449, V.35 and X.21 interfaces);
sp: Services interface;
tap: The tap interface is internally generated and not configurable;
t1: T1 (also called DS1) WAN interface;
t3: T3 (also called DS3) WAN interface;
Thursday, August 13, 2009
Wednesday, August 12, 2009
Sunday, August 02, 2009
Known Attack
zero-day (or zero-hour) attack or threat is a computer threat that tries to exploit computer application vulnerabilities that are unknown to others, undisclosed to the software vendor, or for which no security fix is available. Zero-day exploits (actual code that can use a security hole to carry out an attack) are used or shared by attackers before the software vendor knows about the vulnerability.
Thursday, July 16, 2009
website log analysis for website which host on www.net.cn
1. Download the website log file follow the downloading instruction from www.net.cn
[管理主机] 通过控制面板,配置WebLog日志下载说明 [客服中心][2006年3月16日][6920]
[管理主机] 通过控制面板,配置WebLog日志下载说明 [客服中心][2006年3月16日][6920]
简介:无
内容:
当 您想查看站点的详细的WebLog日志时,可以通过此功能将您想查看的一段时间内日志文件先拷到您站点的wwwlogs目录下,您可以通过FTP的方式将 日志文件下载到您本地进行查看。 注意: 1、由于日志文件较大,当您将日志文件下载到本地后,将您站点的wwwlogs目录下的文件删除,以便节省 您的Web空间。 2、我们只提供一周内的日志文件下载。……
2 Download and install weblog expert from the link blow
http://www.weblogexpert.com/files/WLELiteSetup.exe
3. run the weblog expert. In software window. press new button and input the profile name with any thing you like, domain with your website address, index with the main page of your website. And than press next
4. Press browse button and select the log file which you just download from net.cn and press finish
5 select the profile which you just created and press analyze button now a analysis report would show on your default browser.
Friday, July 10, 2009
Linux NIC bonding
Configuration files:
/etc/sysconfig/network-scripts/ifcfg-eth0
/etc/sysconfig/network-scripts/ifcfg-eth1
/etc/sysconfig/network-scripts/ifcfg-bond0
/etc/modprobe.conf
/proc/net/bonding/bond0
Files contant:
/etc/sysconfig/network-scripts/ifcfg-eth0
/etc/sysconfig/network-scripts/ifcfg-eth1
/etc/sysconfig/network-scripts/ifcfg-bond0
/etc/modprobe.conf
/proc/net/bonding/bond0
Files contant:
- /etc/sysconfig/network-scripts/ifcfg-eth0
DEVICE=eth0
USERCTL=no
ONBOOT=yes
MASTER=bond0
SLAVE=yes
BOOTPROTO=none
ETHTOOL_OPTS="speed 1000 duplex full autoneg on" - /etc/sysconfig/network-scripts/ifcfg-eth2
DEVICE=eth2
USERCTL=no
ONBOOT=yes
MASTER=bond0
SLAVE=yes
BOOTPROTO=none
ETHTOOL_OPTS="speed 1000 duplex full autoneg on" - /etc/sysconfig/network-scripts/ifcfg-bond0
DEVICE=bond0
IPADDR=192.168.100.20
NETMASK=255.255.255.0
NETWORK=192.168.100.0
BROADCAST=192.168.100.255
ONBOOT=yes
BOOTPROTO=none
USERCTL=no - /etc/modprobe.conf
alias eth0 e1000
alias eth1 tg3
alias bond0 bonding
options bond0 miimon=100 mode=5
Bonding mode:
mode=0 (balance-rr)
Round-robin policy: Transmit packets in sequential order from the first available slave through the last. This mode provides load balancing and fault tolerance.
mode=1 (active-backup)
Active-backup policy: Only one slave in the bond is active. A different slave becomes active if, and only if, the active slave fails. The bond's MAC address is externally visible on only one port (network adapter) to avoid confusing the switch. This mode provides fault tolerance. The primary option affects the behavior of this mode.
mode=2 (balance-xor)
XOR policy: Transmit based on [(source MAC address XOR'd with destination MAC address) modulo slave count]. This selects the same slave for each destination MAC address. This mode provides load balancing and fault tolerance.
mode=3 (broadcast)
Broadcast policy: transmits everything on all slave interfaces. This mode provides fault tolerance.
mode=4 (802.3ad)
IEEE 802.3ad Dynamic link aggregation. Creates aggregation groups that share the same speed and duplex settings. Utilizes all slaves in the active aggregator according to the 802.3ad specification.
Adaptive transmit load balancing: channel bonding that does not require any special switch support. The outgoing traffic is distributed according to the current load (computed relative to the speed) on each slave. Incoming traffic is received by the current slave. If the receiving slave fails, another slave takes over the MAC address of the failed receiving slave.
Adaptive load balancing: includes balance-tlb plus receive load balancing (rlb) for IPV4 traffic, and does not require any special switch support. The receive load balancing is achieved by ARP negotiation. The bonding driver intercepts the ARP Replies sent by the local system on their way out and overwrites the source hardware address with the unique hardware address of one of the slaves in the bond such that different peers use different hardware addresses for the server.
The most used are the first four mode types...
Also you can use multiple bond interface but for that you must load the bonding module as many as you need.
Presuming that you want two bond interface you must configure the /etc/modules.conf as follow:
Round-robin policy: Transmit packets in sequential order from the first available slave through the last. This mode provides load balancing and fault tolerance.
mode=1 (active-backup)
Active-backup policy: Only one slave in the bond is active. A different slave becomes active if, and only if, the active slave fails. The bond's MAC address is externally visible on only one port (network adapter) to avoid confusing the switch. This mode provides fault tolerance. The primary option affects the behavior of this mode.
mode=2 (balance-xor)
XOR policy: Transmit based on [(source MAC address XOR'd with destination MAC address) modulo slave count]. This selects the same slave for each destination MAC address. This mode provides load balancing and fault tolerance.
mode=3 (broadcast)
Broadcast policy: transmits everything on all slave interfaces. This mode provides fault tolerance.
mode=4 (802.3ad)
IEEE 802.3ad Dynamic link aggregation. Creates aggregation groups that share the same speed and duplex settings. Utilizes all slaves in the active aggregator according to the 802.3ad specification.
Pre-requisites: 1. Ethtool support in the base drivers for retrieving the speed and duplex of each slave. 2. A switch that supports IEEE 802.3ad Dynamic link aggregation. Most switches will require some type of configuration to enable 802.3ad mode.mode=5 (balance-tlb)
Adaptive transmit load balancing: channel bonding that does not require any special switch support. The outgoing traffic is distributed according to the current load (computed relative to the speed) on each slave. Incoming traffic is received by the current slave. If the receiving slave fails, another slave takes over the MAC address of the failed receiving slave.
Prerequisite: Ethtool support in the base drivers for retrieving the speed of each slave.mode=6 (balance-alb)
Adaptive load balancing: includes balance-tlb plus receive load balancing (rlb) for IPV4 traffic, and does not require any special switch support. The receive load balancing is achieved by ARP negotiation. The bonding driver intercepts the ARP Replies sent by the local system on their way out and overwrites the source hardware address with the unique hardware address of one of the slaves in the bond such that different peers use different hardware addresses for the server.
The most used are the first four mode types...
Also you can use multiple bond interface but for that you must load the bonding module as many as you need.
Presuming that you want two bond interface you must configure the /etc/modules.conf as follow:
alias bond0 bonding options bond0 -o bond0 mode=0 miimon=100 alias bond1 bonding options bond1 -o bond1 mode=1 miimon=100
Thursday, July 09, 2009
Install vmware tool on the ubuntu 9.04
Command list:
sudo aptitude install build-essential linux-headers-generic
sudo touch /usr/src/linux-headers-`uname -r`/include/linux/config.hcp /media/cdrom/VMwareTools-*.tar.gz ~\Desktop\
cd~\Desktop\-d
tar xf VMwareTools-*.tar.gz
cd vmware-tools-distrib/
sudo ./vmware-install.pl
Reference:
Ubuntu community document about vmware https://help.ubuntu.com/community/VMware
How To Install VMware Tools on Ubuntu 8.04 Guests https://help.ubuntu.com/community/VMware
Tuesday, July 07, 2009
Linux hard disk operation
LVM
Create LV process
Create LV process
- Initializing disks or disk partitions
fdisk - fdisk /dev/sd? press p to list the partition table, press n to create a new partition, press e to create extended partition, press p to create a primary partition(maximum 4 per disk) input the number of the partition if create a primary partition, input fisrt cylinder number, input last cylinder number or +sizeM eg: +100M. Change the partition's system ID by use the fdisk command t, input the partition number after the popup Selected Partition, input desired Hex code of the system id here input 8e which for linux LVM. Use the fdisk command w to write the new partition table to the hard disk.
- Assign the disks or disk partitions as physical volume
- Create volume group on one or more PVs
- Use space from a VG as Logical Volume
- Format the LV.
Friday, July 03, 2009
Linux harddisk and NIC test command
hdparm -Tt /dev/hd* test the hdd read speed and system cache speed.
ethtool is used for querying settings of an ethernet device and changing them.
ethtool is used for querying settings of an ethernet device and changing them.
Thursday, May 28, 2009
Reduce The Size Of SQL Server Transaction Log
Introduction
To stop the nightmare of low disk space which cased by huge transaction log file. There three things to do. First truncate the inactive items in the transaction log. However it does not reduce the size of the log file. Secondly shrink the transaction log file. Finally, If possible set a fix maximum size of the transaction log file.
Truncate the inactive items in the transaction log
There are two ways to truncate the transaction log. Doing backup transaction log in the enterprise manager and truncate the transaction log by using T-SQL command.
Using SQL server enterprise manager to backup the transaction log will automatically truncate the inactive transactions after the backup. By doing this you need:
 * Open the enterprise manager from the desktop shortcut or start menu.
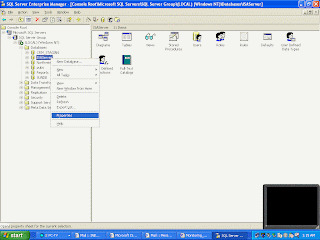
* In the enterprise manager expend following items in the Console Root tree one by one: Microsoft SQL Servers, SQL Server Group, The database server which need perform backup task, Databases.
* Right click the database name and point to All Tasks, and then select Backup Database.
*Fill in the task name and description
* Click the radio button in front of the Transaction Log which in the backup section.
*In the Overwrite section choose Append to media or Overwrite existing media.
* Go to the Option tab make sure Remove inactive entries from transaction log has been selected.
If there are no enough space on the backup device or the backup of transaction log is not necessary. Executing truncate command in SQL Query Analyzer could be more straightforward.
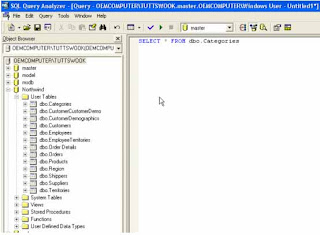 * Open SQL Query Analyzer from start menu or executing the isqlw utility
* Select database which need truncate transaction log.
* Type in following T-SQL command:
use database name
BACKUP LOG WITH TRUNCATE_ONLY
* Press the execute button.
Shrinking the transaction log
Execute following command in the SQL Query Analyzer.
DBCC SHRINKFILE(transaction log file name,desired shrink size in MB)
Fix the maximum size of the transaction log so you do not need worry about it again.
 Open the enterprise manager from the desktop shortcut or start menu.
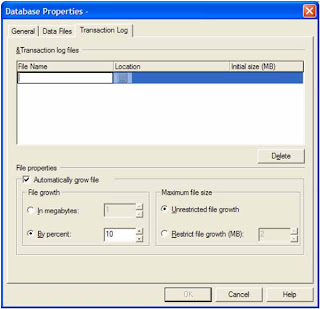
* In the enterprise manager expend following items in the Console Root tree one by one: Microsoft SQL Servers, SQL Server Group, The database server which need perform backup task, Databases.
* Right click the database name and point to Properties.
* Go to Transaction Log tab in the Database Properties window.
* Select Restrict file growth(MB): and fill in the size.
To stop the nightmare of low disk space which cased by huge transaction log file. There three things to do. First truncate the inactive items in the transaction log. However it does not reduce the size of the log file. Secondly shrink the transaction log file. Finally, If possible set a fix maximum size of the transaction log file.
Truncate the inactive items in the transaction log
There are two ways to truncate the transaction log. Doing backup transaction log in the enterprise manager and truncate the transaction log by using T-SQL command.
Using SQL server enterprise manager to backup the transaction log will automatically truncate the inactive transactions after the backup. By doing this you need:
 * Open the enterprise manager from the desktop shortcut or start menu.
* In the enterprise manager expend following items in the Console Root tree one by one: Microsoft SQL Servers, SQL Server Group, The database server which need perform backup task, Databases.
* Right click the database name and point to All Tasks, and then select Backup Database.
*Fill in the task name and description
* Click the radio button in front of the Transaction Log which in the backup section.
*In the Overwrite section choose Append to media or Overwrite existing media.
* Go to the Option tab make sure Remove inactive entries from transaction log has been selected.
If there are no enough space on the backup device or the backup of transaction log is not necessary. Executing truncate command in SQL Query Analyzer could be more straightforward.
 * Open SQL Query Analyzer from start menu or executing the isqlw utility
* Select database which need truncate transaction log.
* Type in following T-SQL command:
use database name
BACKUP LOG WITH TRUNCATE_ONLY
* Press the execute button.
Shrinking the transaction log
Execute following command in the SQL Query Analyzer.
DBCC SHRINKFILE(transaction log file name,desired shrink size in MB)
* In the enterprise manager expend following items in the Console Root tree one by one: Microsoft SQL Servers, SQL Server Group, The database server which need perform backup task, Databases.
* Right click the database name and point to Properties.
* Go to Transaction Log tab in the Database Properties window.
* Select Restrict file growth(MB): and fill in the size.
Thursday, March 12, 2009
Eclipse Code Template
In eclipse we can input a template name and than press a key combination to quickly input big code block. For example we can type in "sysout" and press the default content assist key "Ctrl + space" to input "system.out.println()".
To do this you need check what template eclipse have by click window -> preference.


To do this you need check what template eclipse have by click window -> preference.


Subscribe to:
Posts (Atom)